- Download graphviz-2.38.msi from the graphviz Graphviz site https://graphviz.gitlab.io/_pages/Download/windows/graphviz-2.38.msi
- Install the msi (I used cmd with Admin priviledges)
msiexec /a graphviz-2.38.msi - For some reason this doesn't add Graphviz to your system path, so you need to do that manually. For me this was
SET PATH=%PATH%;C:\Program Files (x86)\Graphviz2.38\bin - I then had to get a specific Windows pygraphviz wheel from this really useful site, specifically pygraphviz-1.3.1-cp34-none-win_amd64.whl https://www.lfd.uci.edu/~gohlke/pythonlibs/#pygraphviz
- Once I had this I then installed it using pip/mingw32 to my virtual environment
$ pip install pygraphviz-1.3.1-cp34-none-win_amd64.whl
Thursday, June 21, 2018
install pygraphviz on windows 10


Wednesday, June 13, 2018
Format Volume in APFS
Open Terminal and run:
sudo diskutil list
sudo diskutil eraseDisk APFS NAME /dev/diskXY
sudo diskutil list
sudo diskutil eraseDisk APFS NAME /dev/diskXY
Wednesday, February 21, 2018
MacBook Pro Touch Bar - The Recovery Server could not be contacted
If you're trying to re-install macOS and you get error message:
The Recovery Server could not be contacted
Just open terminal from the top bar and run: ntpdate time.apple.com
Re-install macOS.
Friday, January 5, 2018
Squeeze every last drop out of macOS High Sierra
Disable swapping
macOS tends to swap memory to disk when there are still tons of free memory available. Swap, aka. virtual memory, is disk-based and thus it is terribly slow, even on a lightning fast SSD. Disabling swap is absolutely fine, as long as you keep the number of running applications low.
When swap is disabled, macOS will try to utilize as much free memory as possible and won’t complain at all until under extreme memory pressure. When it does under pressure, kernel panic will follow. So keep an eye on memory pressure and you will be fine.
There are a number of different modes that macOS manages its memory. In
vm_pageout.h:#define VM_PAGER_DEFAULT 0x1 /* Use default pager. */ #define VM_PAGER_COMPRESSOR_NO_SWAP 0x2 /* In-core compressor only. */ #define VM_PAGER_COMPRESSOR_WITH_SWAP 0x4 /* In-core compressor + swap backend. */ #define VM_PAGER_FREEZER_DEFAULT 0x8 /* Freezer backed by default pager.*/ #define VM_PAGER_FREEZER_COMPRESSOR_NO_SWAP 0x10 /* Freezer backed by in-core compressor only i.e. frozen data remain in-core compressed.*/ #define VM_PAGER_FREEZER_COMPRESSOR_WITH_SWAP 0x20 /* Freezer backed by in-core compressor with swap support too.*/
By default, in-core compressor with swap backend, or
VM_PAGER_COMPRESSOR_WITH_SWAP, is used. You can verify this by the command below:$ sysctl -a vm.compressor_mode
vm.compressor_mode: 4
Mode
0x1, VM_PAGER_DEFAULT, turns off memory compressor and swapping, which is proved to be harmful to the system stability. Modes 0x8, 0x10 and 0x20 are the so-called “freezer” modes, which “freeze” the OS instantly when memory is under pressure. You don’t want to try them.
Mode
0x2, VM_PAGER_COMPRESSOR_NO_SWAP, is the best choice here. It provides memory compressor with swapping disable. In other words, when memory is under pressure, macOS will try to compress the active but non-wired memory, thus freeing part of the memory back to the system. macOS uses WKdm algorithm to compress and decompress the memory, which is fast and battery-efficient. Yet, kernel panic is still possible if there is no more compressible memory.
To change from mode
0x4 to 0x2, use this command and reboot:$ sudo nvram boot-args="vm_compressor=2"
When using mode
0x2, memory pressure must be monitored closely to avoid kernel panic. Once the compressed memory grows close to 50% of total memory capacity, you would either like to close some of the running applications, or simply reboot the system.Disable System Integrity Protection (SIP)
You need to disable parts of SIP for the above to work while leaving others enabled.
If you run csrutil status, even while booted normally, you will see the component parts of it. Each of these can be selectively disabled by running one of the following commands while booted into Recovery mode:
- csrutil enable --no-internal
- csrutil enable --without kext
- csrutil enable --without fs
- csrutil enable --without debug
- csrutil enable --without dtrace
- csrutil enable --without nvram
You can disable two or more components by structuring the command as follows:
- csrutil enable --without kext --without debug
Saturday, October 28, 2017
PowerShell Script to Disable Specific "Spying" Services in Microsoft Windows
Run PowerShell as Administrator
1. Enable script execution in PowerShell
powershell "Set-ExecutionPolicy Unrestricted"
2. Save the below script in a file names disable_services.ps1 then execute it from Powershell by typing at the prompt: ./disable_services.ps1
#requires -version 4.0#requires -runasadministrator
$services = @(    # Services Considered To Have Spying Capabilities    "DcpSvc"                                   # Data Collection and Publishing Service    "diagnosticshub.standardcollector.service" # Microsoft (R) Diagnostics Hub Standard Collector Service    "DiagTrack"                                # Diagnostics Tracking Service    "SensrSvc"                                 # Monitors Various Sensors    "dmwappushservice"                         # WAP Push Message Routing Service    "lfsvc"                                    # Geolocation Service    "MapsBroker"                               # Downloaded Maps Manager    "NetTcpPortSharing"                        # Net.Tcp Port Sharing Service    "RemoteAccess"                             # Routing and Remote Access    "RemoteRegistry"                           # Remote Registry    "SharedAccess"                             # Internet Connection Sharing (ICS)    "TrkWks"                                   # Distributed Link Tracking Client    "WbioSrvc"                                 # Windows Biometric Service    "WMPNetworkSvc"                            # Windows Media Player Network Sharing Service    "WSearch"                                  # Windows Search    # Gaming Based Services    "XblAuthManager"                           # Xbox Live Auth Manager    "XblGameSave"                              # Xbox Live Game Save Service    "XboxNetApiSvc"                            # Xbox Live Networking Service    # Windows HomeGroup Services    "HomeGroupListener"                        # HomeGroup Listener    "HomeGroupProvider"                        # HomeGroup Provider    # Other Optional    #"bthserv"                                 # Bluetooth Support Service    #"wscsvc"                                  # Security Center Service    #"WlanSvc"                                 # WLAN AutoConfig    "OneSyncSvc"                               # Sync Host Service    "AeLookupSvc"                              # Application Experience Service    "PcaSvc"                                   # Program Compatibility Assistant    "WinHttpAutoProxySvc"                      # WinHTTP Web Proxy Auto-Discovery    "UPNPHOST"                                 # Universal Plug & Play Host    "ERSVC"                                    # Error Reporting Service    "WERSVC"                                   # Windows Error Reporting Service    "SSDPSRV"                                  # SSDP Discovery Service    "CDPSvc"                                   # Connected Devices Platform Service    "DsSvc"                                    # Data Sharing Service    "DcpSvc"                                   # Data Collection and Publishing Service    "lfsvc"                                    # Geolocation service)
foreach ($service in $services) { if ( Get-Service "$service*" -Include $service ) { Write-Host " Disabling Service $service ..." Get-Service -Name $service | Stop-Service -Force Get-Service -Name $service | Set-Service -StartupType Disabled }}Saturday, October 14, 2017
Change / Check / Clear DNS from Command Line of Mac OSX
How to Set DNS Servers from the Command Line of OS X with networksetup
Set OpenDNS for the first two DNS servers, and Google DNS as the third fallback:
networksetup -setdnsservers Wi-Fi 208.67.222.222 208.67.220.220 8.8.8.8Checking DNS Settings with networksetup
This will report back whatever the current DNS settings are, if any:
networksetup -getdnsservers Wi-FiClear the local DNS cache
When URLs are just not resolving the way you want it, to time to clear or flush the dns nameserver local cache:
sudo killall -HUP mDNSResponderRevert Back and Clear All DNS Servers with networksetup
Remove any existing custom DNS server settings:
sudo networksetup -setdnsservers Wi-Fi emptySaturday, September 2, 2017
macOS Sierra: Delete Your APFS Partition the Right Way
So, you’ve spent some time experimenting with Apple File System (APFS). What happens when you’re finished playing with the new file system and want to reclaim that space? It’s not as easy as just erasing the volume in Disk Utility, unfortunately. The current way APFS is implemented, there’s a specific set of steps you need to take when you want to delete your APFS partition.

When you want to delete your APFS partition, there’s a right way and a wrong way (Image Credit: Lalmch)
So, you’ve spent some time experimenting with Apple File System (APFS). What happens when you’re finished playing with the new file system and want to reclaim that space? It’s not as easy as just erasing the volume in Disk Utility, unfortunately. The current way APFS is implemented, there’s a specific set of steps you need to take when you want to delete your APFS partition.

When you want to delete your APFS partition, there’s a right way and a wrong way (Image Credit: Lalmch)
What’s With the Hassle?
Because of the way APFS is designed, we now have something called a container. This is the base storage unit for APFS, and it’s managed differently from older file systems. Each container can export one or more volumes, the actual “drives” you see in Finder. Because of this, you’ll see an APFS Container and your volumes in Disk Utility, separate from the physical drive the container is located on.
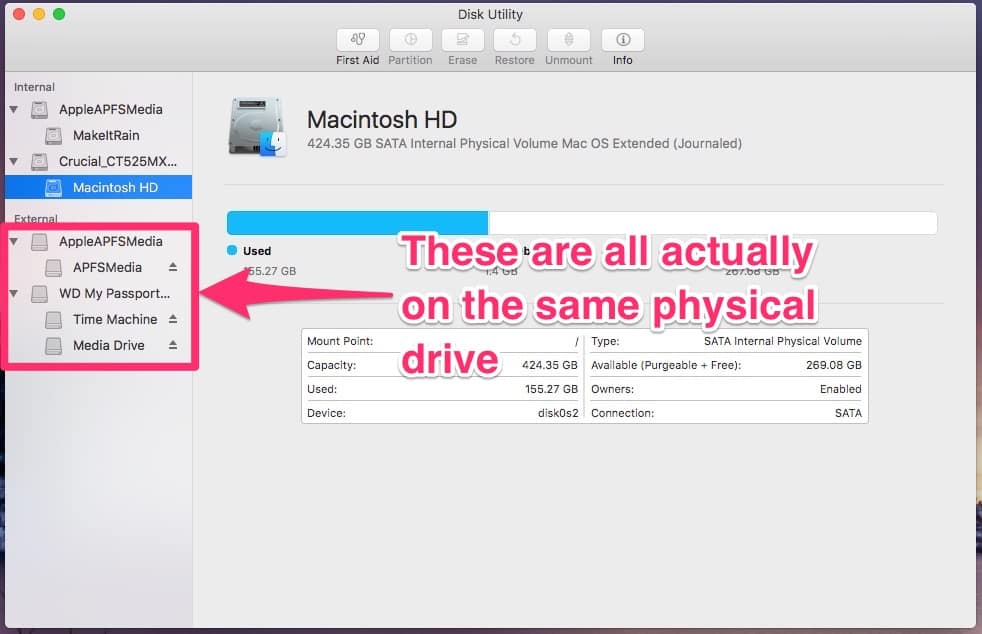
Disk Utility with APFS Volumes
In the Terminal, running diskutil list will reveal this in even starker contrast. You can see disk2s2 in the screenshot below, the partition on my external hard drive hosting the APFS Container. Below that, /dev/disk3 is the APFS container, and /dev/disk3s1 is the APFS volume.
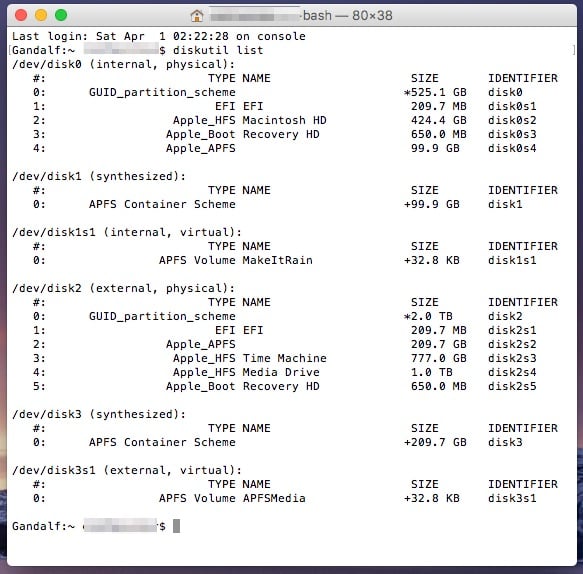
A diskutil list, showing the APFS Container scheme.
Because of the way APFS is designed, we now have something called a container. This is the base storage unit for APFS, and it’s managed differently from older file systems. Each container can export one or more volumes, the actual “drives” you see in Finder. Because of this, you’ll see an APFS Container and your volumes in Disk Utility, separate from the physical drive the container is located on.
Disk Utility with APFS Volumes
In the Terminal, running diskutil list will reveal this in even starker contrast. You can see disk2s2 in the screenshot below, the partition on my external hard drive hosting the APFS Container. Below that, /dev/disk3 is the APFS container, and /dev/disk3s1 is the APFS volume.
A diskutil list, showing the APFS Container scheme.
Delete Your APFS Partition the Right Way
If you use Disk Utility to erase an APFS volume and format it HFS+, you’ll find that the old APFS container sticks around. The same thing happens if you use diskutil the wrong way. This means you can’t merge the partition back into the other partitions on your external hard drive. Here’s what you need to do in order to go about deleting your APFS partition correctly. First, use Disk Utility to eject your APFS container.

Use Disk Utility to eject your APFS container
Now, launch Terminal and issue this command:
diskutil list
Make note of the device on your external drive (in my case, disk2).
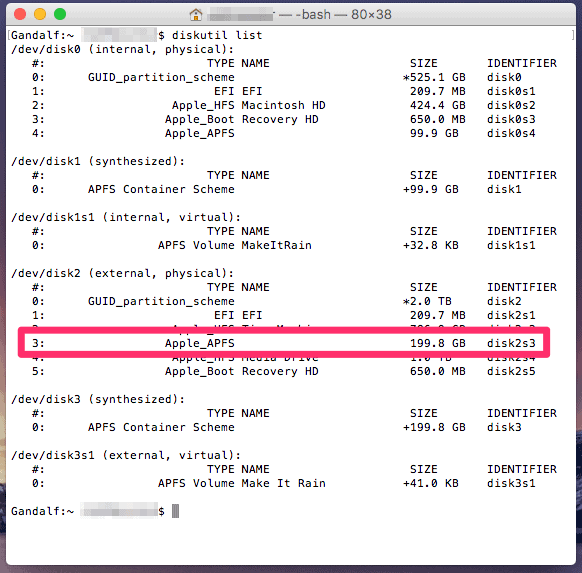
Running diskutil list gives us our APFS device identifier
Finally, issue this command in Terminal to delete the APFS container and its volume, replacing disk2s3 with your actual device identifier.
diskutil apfs deleteContainer disk2s3
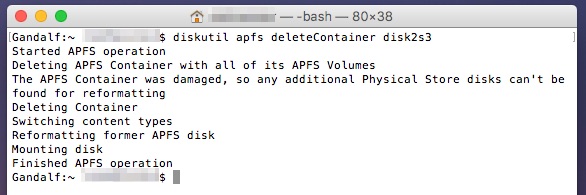
Deleting the APFS partition
You may get a message that the APFS container was damaged. If so, you can safely ignore that message. However, if the operation fails and you’re working with an external USB drive, try disconnecting the drive and then plugging it back in. For an internal drive, you’ll unfortunately need to reboot.
If you use Disk Utility to erase an APFS volume and format it HFS+, you’ll find that the old APFS container sticks around. The same thing happens if you use diskutil the wrong way. This means you can’t merge the partition back into the other partitions on your external hard drive. Here’s what you need to do in order to go about deleting your APFS partition correctly. First, use Disk Utility to eject your APFS container.
Use Disk Utility to eject your APFS container
Now, launch Terminal and issue this command:
diskutil list
Make note of the device on your external drive (in my case, disk2).
Running diskutil list gives us our APFS device identifier
Finally, issue this command in Terminal to delete the APFS container and its volume, replacing disk2s3 with your actual device identifier.
diskutil apfs deleteContainer disk2s3
Deleting the APFS partition
You may get a message that the APFS container was damaged. If so, you can safely ignore that message. However, if the operation fails and you’re working with an external USB drive, try disconnecting the drive and then plugging it back in. For an internal drive, you’ll unfortunately need to reboot.
Remember, It’s Pretty Much Still Beta
Bear in mind that the current tools we have for working with APFS are intended to keep casual users from messing up their Macs. On macOS Sierra 10.12.4, APFS is still rather in a beta stage. I expect the UI tools will get easier to use when all of the kinks are worked out.
Either remove one partition (not recommended)
- Open Utilities -> Terminal
- Enter
diskutil list
- Enter
diskutil umountDisk /dev/diskX with diskX: disk identifier of the CoreStorage volume (probably disk2)
- Enter
diskutil umountDisk /dev/diskY with diskY: disk identifier of your internal drive (probably disk0) and
- Enter
gpt -r show /dev/diskY to get an overview and the index number of Macintosh H(probably 2)
- Enter
gpt remove -i 2 /dev/diskY with diskY: disk identifier of your internal drive (probably disk0)
- Enter
exit and quit Terminal
Or remove all partitions (recommended)
- Open Utilities -> Terminal
- Enter
diskutil list
- Enter
diskutil umountDisk /dev/diskX with diskX: disk identifier of the CoreStorage volume (probably disk2)
- Enter
diskutil umountDisk /dev/diskY with diskY: disk identifier of your internal drive (probably disk0) and
- Enter
gpt destroy /dev/diskY with diskY: disk identifier of your internal drive (probably disk0)
- Enter
exit and quit Terminal
- Open Disk Utility and partition your internal drive
Either reinstalling OS X booted to IRM
- Quit Disk Utility and open Restore OS X
- Install and configure OS X
- Download the latest OS X and upgrade to OS X El Capitan
- attach your backup drive
- Use the Migration Assistant to import your old users/data
Or reinstalling OS X booted to a bootable El Capitan installer thumb drive (recommended)
- Quit Disk Utility
- attach your backup drive
- Install OS X El Capitan
- Use the Migration Assistant to import your old user(s)/data
Bear in mind that the current tools we have for working with APFS are intended to keep casual users from messing up their Macs. On macOS Sierra 10.12.4, APFS is still rather in a beta stage. I expect the UI tools will get easier to use when all of the kinks are worked out.
Either remove one partition (not recommended)
- Open Utilities -> Terminal
- Enter
diskutil list - Enter
diskutil umountDisk /dev/diskXwith diskX: disk identifier of the CoreStorage volume (probably disk2) - Enter
diskutil umountDisk /dev/diskYwith diskY: disk identifier of your internal drive (probably disk0) and - Enter
gpt -r show /dev/diskYto get an overview and the index number of Macintosh H(probably 2) - Enter
gpt remove -i 2 /dev/diskYwith diskY: disk identifier of your internal drive (probably disk0) - Enter
exitand quit Terminal
Or remove all partitions (recommended)
- Open Utilities -> Terminal
- Enter
diskutil list - Enter
diskutil umountDisk /dev/diskXwith diskX: disk identifier of the CoreStorage volume (probably disk2) - Enter
diskutil umountDisk /dev/diskYwith diskY: disk identifier of your internal drive (probably disk0) and - Enter
gpt destroy /dev/diskYwith diskY: disk identifier of your internal drive (probably disk0) - Enter
exitand quit Terminal - Open Disk Utility and partition your internal drive
Either reinstalling OS X booted to IRM
- Quit Disk Utility and open Restore OS X
- Install and configure OS X
- Download the latest OS X and upgrade to OS X El Capitan
- attach your backup drive
- Use the Migration Assistant to import your old users/data
Or reinstalling OS X booted to a bootable El Capitan installer thumb drive (recommended)
- Quit Disk Utility
- attach your backup drive
- Install OS X El Capitan
- Use the Migration Assistant to import your old user(s)/data
Formatting a Disk to Mac OS Extended Journaled (APFS) from Terminal in Mac OS X
diskutil eraseDisk APFS DiskName /dev/DiskX
diskutil eraseDisk APFS DiskName /dev/DiskXFormatting a Disk to Mac OS Extended Journaled (JHFS+) from Terminal in Mac OS X
diskutil eraseDisk JHFS+ DiskName /dev/DiskX
diskutil eraseDisk JHFS+ DiskName /dev/DiskXFormatting a Disk to Mac OS Extended (HFS+) from Terminal in Mac OS X
diskutil eraseDisk HFS+ DiskName /dev/DiskX
diskutil eraseDisk HFS+ DiskName /dev/DiskXFormatting a Disk to MS-DOS fat32 from the Command Line in Mac OS X
diskutil eraseDisk FAT32 DiskName /dev/DiskX
diskutil eraseDisk FAT32 DiskName /dev/DiskXFormatting a Disk to ExFAT from the Command Line in Mac OS X
diskutil eraseDisk ExFAT DiskName /dev/DiskX
Again, any of these commands erase the entire target disk and obliterates any data on it.
Users who would like additional details or information about the other options available including MBR and GPT settings can query the man page with “man diskutil” and searching for “eraseDisk”, or execute the command with no specifics like so:
diskutil eraseDisk
Usage: diskutil eraseDisk format name [APM[Format]|MBR[Format]|GPT[Format]]
MountPoint|DiskIdentifier|DeviceNode
Completely erase an existing whole disk. All volumes on this disk will be
destroyed. Ownership of the affected disk is required.
Format is the specific file system name you want to erase it as (HFS+, etc.).
Name is the (new) volume name (subject to file system naming restrictions),
or can be specified as %noformat% to skip initialization (newfs).
You cannot erase the boot disk.
Example: diskutil eraseDisk JHFS+ UntitledUFS disk3
diskutil eraseDisk ExFAT DiskName /dev/DiskX
Again, any of these commands erase the entire target disk and obliterates any data on it.
Users who would like additional details or information about the other options available including MBR and GPT settings can query the man page with “man diskutil” and searching for “eraseDisk”, or execute the command with no specifics like so:
diskutil eraseDisk
Usage: diskutil eraseDisk format name [APM[Format]|MBR[Format]|GPT[Format]]
MountPoint|DiskIdentifier|DeviceNode
Completely erase an existing whole disk. All volumes on this disk will be
destroyed. Ownership of the affected disk is required.
Format is the specific file system name you want to erase it as (HFS+, etc.).
Name is the (new) volume name (subject to file system naming restrictions),
or can be specified as %noformat% to skip initialization (newfs).
You cannot erase the boot disk.
Example: diskutil eraseDisk JHFS+ UntitledUFS disk3
Subscribe to:
Posts (Atom)