So, you’ve spent some time experimenting with Apple File System (APFS). What happens when you’re finished playing with the new file system and want to reclaim that space? It’s not as easy as just erasing the volume in Disk Utility, unfortunately. The current way APFS is implemented, there’s a specific set of steps you need to take when you want to delete your APFS partition.

When you want to delete your APFS partition, there’s a right way and a wrong way (Image Credit: Lalmch)
So, you’ve spent some time experimenting with Apple File System (APFS). What happens when you’re finished playing with the new file system and want to reclaim that space? It’s not as easy as just erasing the volume in Disk Utility, unfortunately. The current way APFS is implemented, there’s a specific set of steps you need to take when you want to delete your APFS partition.

When you want to delete your APFS partition, there’s a right way and a wrong way (Image Credit: Lalmch)
What’s With the Hassle?
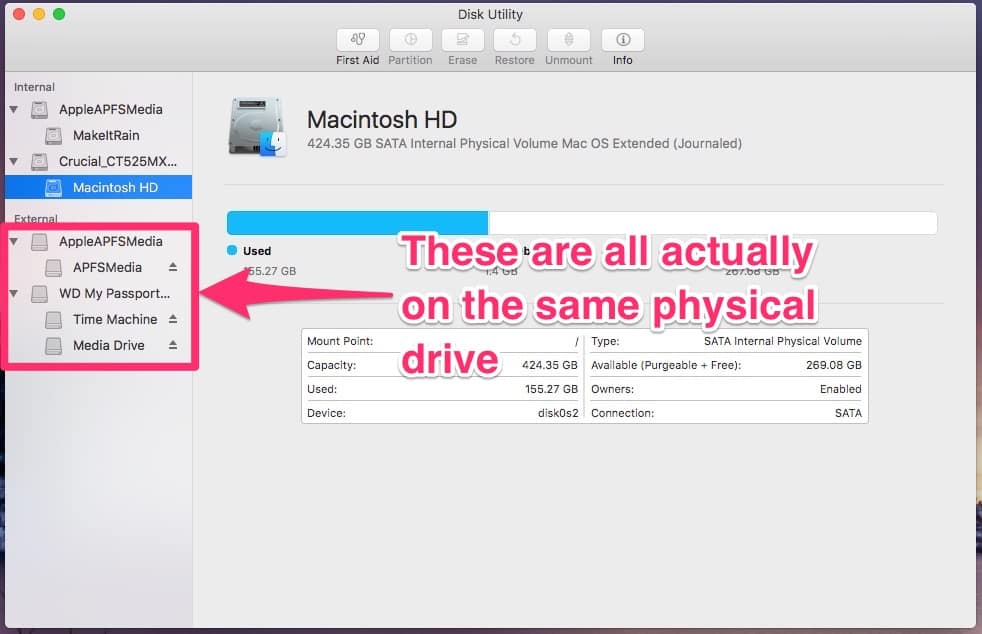
Because of the way APFS is designed, we now have something called a container. This is the base storage unit for APFS, and it’s managed differently from older file systems. Each container can export one or more volumes, the actual “drives” you see in Finder. Because of this, you’ll see an APFS Container and your volumes in Disk Utility, separate from the physical drive the container is located on.
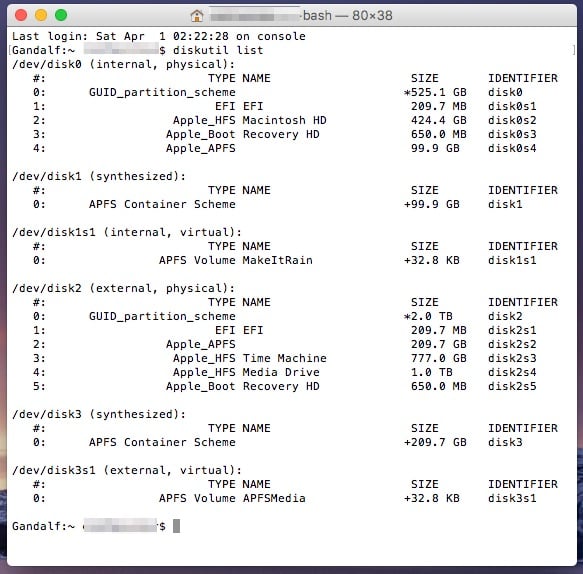
In the Terminal, running diskutil list will reveal this in even starker contrast. You can see disk2s2 in the screenshot below, the partition on my external hard drive hosting the APFS Container. Below that, /dev/disk3 is the APFS container, and /dev/disk3s1 is the APFS volume.
Delete Your APFS Partition the Right Way
If you use Disk Utility to erase an APFS volume and format it HFS+, you’ll find that the old APFS container sticks around. The same thing happens if you use diskutil the wrong way. This means you can’t merge the partition back into the other partitions on your external hard drive. Here’s what you need to do in order to go about deleting your APFS partition correctly. First, use Disk Utility to eject your APFS container.
Now, launch Terminal and issue this command:
diskutil list
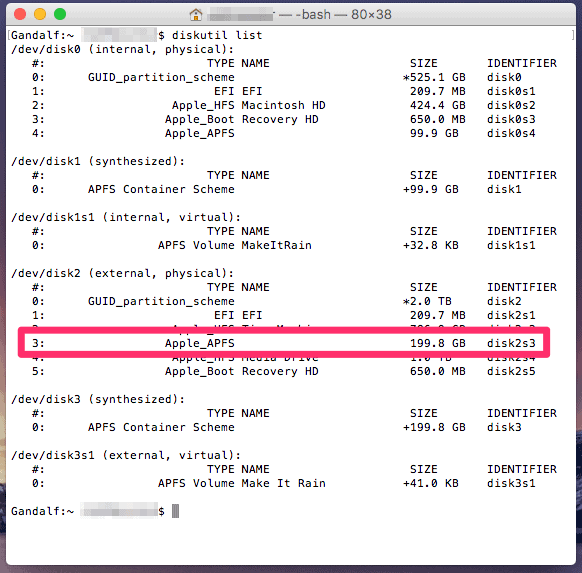
Make note of the device on your external drive (in my case, disk2).
Finally, issue this command in Terminal to delete the APFS container and its volume, replacing disk2s3 with your actual device identifier.
diskutil apfs deleteContainer disk2s3
You may get a message that the APFS container was damaged. If so, you can safely ignore that message. However, if the operation fails and you’re working with an external USB drive, try disconnecting the drive and then plugging it back in. For an internal drive, you’ll unfortunately need to reboot.
Remember, It’s Pretty Much Still Beta
Bear in mind that the current tools we have for working with APFS are intended to keep casual users from messing up their Macs. On macOS Sierra 10.12.4, APFS is still rather in a beta stage. I expect the UI tools will get easier to use when all of the kinks are worked out.
Either remove one partition (not recommended)
- Open Utilities -> Terminal
- Enter
diskutil list
- Enter
diskutil umountDisk /dev/diskX with diskX: disk identifier of the CoreStorage volume (probably disk2)
- Enter
diskutil umountDisk /dev/diskY with diskY: disk identifier of your internal drive (probably disk0) and
- Enter
gpt -r show /dev/diskY to get an overview and the index number of Macintosh H(probably 2)
- Enter
gpt remove -i 2 /dev/diskY with diskY: disk identifier of your internal drive (probably disk0)
- Enter
exit and quit Terminal
Or remove all partitions (recommended)
- Open Utilities -> Terminal
- Enter
diskutil list
- Enter
diskutil umountDisk /dev/diskX with diskX: disk identifier of the CoreStorage volume (probably disk2)
- Enter
diskutil umountDisk /dev/diskY with diskY: disk identifier of your internal drive (probably disk0) and
- Enter
gpt destroy /dev/diskY with diskY: disk identifier of your internal drive (probably disk0)
- Enter
exit and quit Terminal
- Open Disk Utility and partition your internal drive
Either reinstalling OS X booted to IRM
- Quit Disk Utility and open Restore OS X
- Install and configure OS X
- Download the latest OS X and upgrade to OS X El Capitan
- attach your backup drive
- Use the Migration Assistant to import your old users/data
Or reinstalling OS X booted to a bootable El Capitan installer thumb drive (recommended)
- Quit Disk Utility
- attach your backup drive
- Install OS X El Capitan
- Use the Migration Assistant to import your old user(s)/data
Bear in mind that the current tools we have for working with APFS are intended to keep casual users from messing up their Macs. On macOS Sierra 10.12.4, APFS is still rather in a beta stage. I expect the UI tools will get easier to use when all of the kinks are worked out.
Either remove one partition (not recommended)
- Open Utilities -> Terminal
- Enter
diskutil list - Enter
diskutil umountDisk /dev/diskXwith diskX: disk identifier of the CoreStorage volume (probably disk2) - Enter
diskutil umountDisk /dev/diskYwith diskY: disk identifier of your internal drive (probably disk0) and - Enter
gpt -r show /dev/diskYto get an overview and the index number of Macintosh H(probably 2) - Enter
gpt remove -i 2 /dev/diskYwith diskY: disk identifier of your internal drive (probably disk0) - Enter
exitand quit Terminal
Or remove all partitions (recommended)
- Open Utilities -> Terminal
- Enter
diskutil list - Enter
diskutil umountDisk /dev/diskXwith diskX: disk identifier of the CoreStorage volume (probably disk2) - Enter
diskutil umountDisk /dev/diskYwith diskY: disk identifier of your internal drive (probably disk0) and - Enter
gpt destroy /dev/diskYwith diskY: disk identifier of your internal drive (probably disk0) - Enter
exitand quit Terminal - Open Disk Utility and partition your internal drive
Either reinstalling OS X booted to IRM
- Quit Disk Utility and open Restore OS X
- Install and configure OS X
- Download the latest OS X and upgrade to OS X El Capitan
- attach your backup drive
- Use the Migration Assistant to import your old users/data
Or reinstalling OS X booted to a bootable El Capitan installer thumb drive (recommended)
- Quit Disk Utility
- attach your backup drive
- Install OS X El Capitan
- Use the Migration Assistant to import your old user(s)/data
Formatting a Disk to Mac OS Extended Journaled (APFS) from Terminal in Mac OS X
diskutil eraseDisk APFS DiskName /dev/DiskX
diskutil eraseDisk APFS DiskName /dev/DiskXFormatting a Disk to Mac OS Extended Journaled (JHFS+) from Terminal in Mac OS X
diskutil eraseDisk JHFS+ DiskName /dev/DiskX
diskutil eraseDisk JHFS+ DiskName /dev/DiskXFormatting a Disk to Mac OS Extended (HFS+) from Terminal in Mac OS X
diskutil eraseDisk HFS+ DiskName /dev/DiskX
diskutil eraseDisk HFS+ DiskName /dev/DiskXFormatting a Disk to MS-DOS fat32 from the Command Line in Mac OS X
diskutil eraseDisk FAT32 DiskName /dev/DiskX
diskutil eraseDisk FAT32 DiskName /dev/DiskXFormatting a Disk to ExFAT from the Command Line in Mac OS X
diskutil eraseDisk ExFAT DiskName /dev/DiskX
Again, any of these commands erase the entire target disk and obliterates any data on it.
Users who would like additional details or information about the other options available including MBR and GPT settings can query the man page with “man diskutil” and searching for “eraseDisk”, or execute the command with no specifics like so:
diskutil eraseDisk
Usage: diskutil eraseDisk format name [APM[Format]|MBR[Format]|GPT[Format]]
MountPoint|DiskIdentifier|DeviceNode
Completely erase an existing whole disk. All volumes on this disk will be
destroyed. Ownership of the affected disk is required.
Format is the specific file system name you want to erase it as (HFS+, etc.).
Name is the (new) volume name (subject to file system naming restrictions),
or can be specified as %noformat% to skip initialization (newfs).
You cannot erase the boot disk.
Example: diskutil eraseDisk JHFS+ UntitledUFS disk3


No comments:
Post a Comment